On a Linux system, having regular backups is critical to protect your data, keep it safe, and make recovery easier if something goes wrong. Whether you’re handling personal files, running a development setup, or managing servers, you need a solid backup plan.
One of the easiest and most flexible ways to handle backups is by writing a custom script, which lets you decide exactly what gets backed up, when, and where it’s stored. It also saves time and reduces the risk of losing data.
In this guide, you’ll learn how to create a simple shell script that automatically backs up important files.
Why Use a Backup Script?
Using a backup script in Linux gives system admins more control and flexibility when it comes to protecting important data.
Here’s why it’s a smart move:
- Automated Backups: You can schedule the script to run on its own using tools like cron, so you don’t have to remember to back things up manually.
- Full Control: You decide what gets backed up, where it goes, and how often. Whether it’s daily copies of
/etc, weekly snapshots of home directories, or just selective directories.
Creating a Backup Script for Important Files
Open your terminal and navigate to the directory where you want to store the script (e.g., your home directory or /usr/local/bin/ for system-wide access).
Create the script file using a text editor like nano or vim:
nano backup_script.sh
Below is a basic script that backs up files to a specified directory.
#!/bin/bash

# Define source and destination directories
SOURCE_DIR="/home/user/Documents"     # Source directory to back up
BACKUP_DIR="/home/user/backups"       # Destination directory for backups

# Create a timestamp for the backup folder
TIMESTAMP=$(date +'%Y%m%d%H%M%S')

# Create a new backup folder with the timestamp
BACKUP_FOLDER="$BACKUP_DIR/backup_$TIMESTAMP"
mkdir -p "$BACKUP_FOLDER"

# Copy files to the backup folder
cp -r "$SOURCE_DIR"/* "$BACKUP_FOLDER"

# Log the completion of the backup
echo "Backup completed at $TIMESTAMP" >> "$BACKUP_DIR/backup_log.txt"

# Optional: Remove backups older than 30 days
find "$BACKUP_DIR" -type d -name "backup_*" -mtime +30 -exec rm -rf {} ;
Explanation of the script:
SOURCE_DIR: The directory containing the files you want to back up (e.g.,/home/user/Documents).BACKUP_DIR: The directory where backups will be stored (e.g.,/home/user/backups).TIMESTAMP: A variable that stores the current date and time to uniquely identify each backup folder.mkdir -p: Creates the backup folder with the timestamp.cp -r: Copies all files and subdirectories from the source directory to the backup folder.- The echo command logs the backup completion and adds a timestamp to the log file.
- The find command removes backups older than 30 days, keeping your backup directory from filling up with old files.
Save and close the script (in nano, press CTRL + X, then Y to confirm, and press Enter).
Now that the script is written, you need to make it executable.
chmod +x backup_script.sh
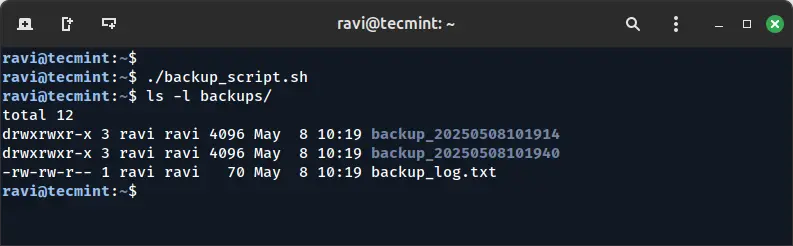
You can now run the script manually by executing:
./backup_script.sh
If everything is set up correctly, it should create a backup of your files in the specified backup directory.
Schedule the Backup Script Using Cron
To automate the backup process, you can schedule the script to run at specific intervals using cron, the Linux job scheduler.
Open the cron configuration file by typing:
crontab -e
Add a cron job to run the script at a specified time. For example, to run the backup script every day at 2 AM, add the following line to the cron file:
0 2 * * * /path/to/backup_script.sh
The script will now run automatically at the specified time.
To confirm the backup, you can check the backup directory to verify that backups are being created as expected, or you can also examine the cron logs to confirm that the backup script is running at the scheduled time.
grep CRON /var/log/syslog
Add Compression with tar and gzip
Instead of copying files directly, you can compress the entire backup into a .tar.gz archive, which saves space and keeps things tidy.
Modified script with compression:
#!/bin/bash

# Define source and destination directories
SOURCE_DIR="/home/user/Documents"
BACKUP_DIR="/home/user/backups"

# Create a timestamp
TIMESTAMP=$(date +'%Y%m%d%H%M%S')

# Define the backup filename
BACKUP_FILE="$BACKUP_DIR/backup_$TIMESTAMP.tar.gz"

# Create the backup directory if it doesn't exist
mkdir -p "$BACKUP_DIR"

# Create a compressed archive of the source directory
tar -czf "$BACKUP_FILE" -C "$SOURCE_DIR" .

# Log the backup completion
echo "Compressed backup created at $TIMESTAMP" >> "$BACKUP_DIR/backup_log.txt"

# Optional: Delete old backups (over 30 days)
find "$BACKUP_DIR" -type f -name "backup_*.tar.gz" -mtime +30 -exec rm -f {} ;
Send Backup to a Remote Server Using scp
If you want to store your backups on a remote server (like a backup VPS or NAS), you can upload the archive using scp command.
Add following to the end of the script:
# Define remote server info
REMOTE_USER="your_user"
REMOTE_HOST="your-server-ip"
REMOTE_DIR="/remote/backup/location"

# Send the backup file to the remote server
scp "$BACKUP_FILE" "$REMOTE_USER@$REMOTE_HOST:$REMOTE_DIR"
Set up SSH key authentication between your local machine and the remote server to avoid entering passwords manually.
Conclusion
Creating a backup script in Linux is a simple and practical way to protect your data from accidental loss. By scheduling the script with cron, you can automate the backup process so your important files are saved regularly without needing to do it manually.


