Let’s start by defining a bad sector/bad block, it is a section on a disk drive or flash memory that can no longer be read from or written to, which usually happens due to permanent physical damage on the disk surface or failing flash memory transistors.
As more bad sectors build up, they can seriously impact your storage device’s performance, reduce its capacity, or even lead to complete hardware failure.
It is also important to note that the presence of bad blocks should alert you to start thinking of getting a new disk drive or simply mark the bad blocks as unusable.
Therefore, in this article, we will go through the necessary steps that can enable you to determine the presence or absence of bad sectors on your Linux disk drive or flash memory using certain disk scanning utilities.
That said, below are the methods:
1. Check for Bad Sectors Using the badblocks Tool
The badblocks tool lets you scan a storage device, like a hard disk or external drive, for bad sectors. Devices are usually listed as files like /dev/sdc or /dev/sda.
Step 1: List All Disks and Partitions
Firstly, use the fdisk command with superuser privileges to display information about all your disk drives or flash memory plus their partitions:
sudo fdisk -l
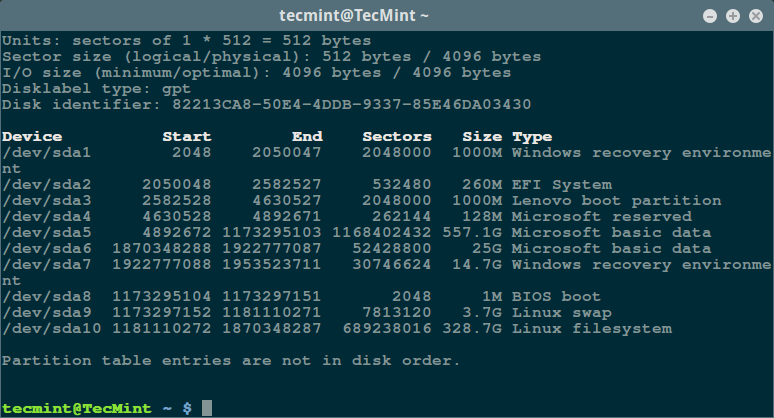
This will help you identify the correct device name to scan.
Step 2: Scan for Bad Blocks
Then scan your Linux disk drive to check for bad sectors/blocks by typing:
sudo badblocks -v /dev/sda10 > badsectors.txt

In the command above, badblocks is scanning device /dev/sda10 (remember to specify your actual device) with the -v enabling it to display details of the operation. In addition, the results of the operation are stored in the file badsectors.txt by means of output redirection.
In case you discover any bad sectors on your disk drive, unmount the disk and instruct the operating system not to write to the reported sectors as follows.
Step 3: Mark Bad Sectors as Unusable
You will need to employ e2fsck (for ext2/ext3/ext4 file systems) or fsck command with the badsectors.txt file and the device file as in the command below.
For ext2/ext3/ext4 File Systems:
sudo e2fsck -l badsectors.txt /dev/sda10
For Other File Systems:
sudo fsck -l badsectors.txt /dev/sda10
2. Scan Disk Health with Smartmontools (Recommended)
This method is more reliable and efficient for modern disks (ATA/SATA and SCSI/SAS hard drives and solid-state drives) which ship in with a S.M.A.R.T (Self-Monitoring, Analysis and Reporting Technology) system that helps detect, report and possibly log their health status, so that you can figure out any impending hardware failures.
Step 1: Install smartmontools in Linux
You can install smartmontools by running the command below:
sudo apt install smartmontools  #For Debian-based
sudo dnf install smartmontools  #For RHEL-based
Step 2: Use smartctl to Run Health Checks
Once the installation is complete, use smartctl, which controls the S.M.A.R.T system integrated into a disk. You can look through its man page or help page as follows:
man smartctl
smartctl -h
Step 3: Run a Basic Health Test
Now execute the smartctrl command and name your specific device as an argument, as in the following command, the flag -H or --health is included to display the SMART overall health self-assessment test result.
sudo smartctl -H /dev/sda10

The result above indicates that your hard disk is healthy and may not experience hardware failures anytime soon.
Optional: View Full SMART Report
For an overview of disk information, use the -a or --all option to print out all SMART information concerning a disk and -x or --xall which displays all SMART and non-SMART information about a disk.
sudo smartctl -a /dev/sda10
Or even more comprehensive:
$ sudo smartctl -x /dev/sda10
Wrapping Up
In this guide, we explored how to identify and manage bad sectors on Linux drives using badblocks and smartmontools. Keeping tabs on your storage health is crucial—and these tools make it pretty straightforward.
If you have any questions, feedback, or suggestions, feel free to reach out in the comment section below. And as always, stay tuned to Tecmint for more Linux tips and tutorials!


